Introduction to Arduino Labs
Danger: Read This First!
Before proceeding any further through this documentation or making any of the circuits discussed within, you must read the
Before Starting the Exercises
Before starting the laboratory exercises, you should review the contents of the Mechatronics Kit Information document, located in the "Practicals Labs in the 1st Semester" area of the Mechatronics course Blackboard site.
Note: Open this website on the computer you are programming your Arduino on
We recommend opening this documentation on the computer you are using for programming, as there are several code examples that you can copy and paste directly into your sketches.
Learning Outcomes
By the end of these exercises you should be able to:
- Use basic hand tools to construct the mechanical and electrical systems of a simple mobile robot.
- Program an Arduino to interface with sensors and actuators to achieve a specified goal.
- Integrate software programs, control concepts, and hardware to create a functional mechatronic system
Introduction
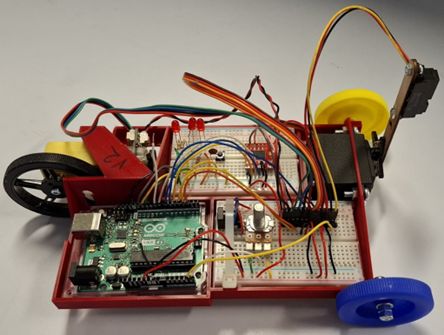
During this activity, you will have three laboratory sessions to complete a series of practical exercises based around a simple mobile robotic system, as shown in
Website Layout
The Website is laid out in the following sections:
- This Introduction: A quick overview of this section of the course, providing aims and objectives, the structure of laboratory sessions, and a suggested timeline for a subset of the assessed exercises.
Laptop Disclaimer: You MUST read this disclaimer before continuing!Building the Robot Chassis Document: This section describes the construction of the robot chassis and the recommended layout of the electronic circuit.Introductory and Supplementary Material: There are two pages in this section:Supplementary Signposting Document: This document serves as a reference for students who are not yet confident with C or Arduino programming. It provides links to external websites and relevant sections of the Arduino Language Reference.Introductory Exercises: This document contains two non-assessed exercises to help you install and configure the Arduino IDE for these laboratory activities and learn simple I/O programming.
Basic Exercises: This section provides five basic, assessed exercises focused on reading sensors and driving actuators. These exercises build the scaffolding required for the more advanced integration exercises.Advanced Exercises: This section contains three advanced, assessed exercises requiring you to integrate the sensor and actuator concepts from the basic exercises into simple mechatronic systems. In these exercises, we introduce PI controller implementation and simple finite-state machine programming.Assessment Section: This section provides details regarding the assessment criteria for all exercises.
Note
You must complete and have marked off all basic exercises before you can receive credit for any advanced exercises.
Aims and Objectives
The aims of these laboratory exercises are to:
- Familiarize yourself with the Arduino Integrated Development Environment (IDE) and gain experience uploading user programs to an embedded target.
- Gain hands-on experience reading analog sensor voltages into the Arduino and converting them into meaningful engineering units.
- Drive different types of actuators using pulse-width modulation (PWM) outputs from the Arduino.
- Integrate sensors and actuators to build functional a mechatronic system.
To achieve these aims, the laboratory sessions are split into several assessed exercises, categorized as either basic or advanced. A suggested timeline for completing the
To complete the
A hyperlinked list of the assessed exercises is provided below:
- Basic:
LED Pattern - Basic:
IR Sensor Measurement + Graph - Basic:
Externally Powered Servo - Basic:
DC Motor - Basic:
Encoders + Motor - Advanced:
PI Control – IR Sensor Distance - Advanced:
PI Control – Encoder Position - Advanced:
PI Control – IR with Sequence
Each of these exercises will be assessed during the laboratory session, using the assessment structure outlined in the
Warning
DO NOT leave all your exercises until the end of the 3rd laboratory session to get marked. This may result in running out of time to have your work marked within the allotted lab hours, which will result in lost marks. Instead, get your work marked as soon as you complete each assessed exercise (see the note below).
Structure of Laboratory Sessions
The hardware kits you will use during these exercises are loaned to you for the duration of the Mechatronics module. You are responsible for taking them home between laboratory and project sessions.
Note
We provide three scheduled laboratory sessions for this activity. However, you are expected to complete additional work at home to ensure that all exercises are finished AND marked before the end of the third session. Demonstrators will stop marking 15 minutes before the end of the third laboratory session. The remaining time is reserved for packing up, tidying your workspace, and exiting the lab.
You may request marking for any completed exercise at any point during the three sessions, provided a demonstrator or member of staff is available.
Warning
Any exercises not marked before the deadline—regardless of whether they have been completed—will receive a mark of zero. Please ensure that you have your work marked incrementally as you progress through the exercises, rather than leaving them until the final moments.
Suggested Timeline for completing the Basic Exercises, only.
There is no rigid schedule for your progress through these exercises; however, the following timeline provides sufficient time to complete all
By the end of the 1st lab session
By the end of the first lab session, you should have completed and had marked the following::
Before the start of the 2nd lab session
Before attending the second lab session, you should have:
- Completed and double-checked the circuit wiring for the following two exercises:
- Basic:
IR Sensor Measurement + Graph - Basic:
Externally Powered Servo
- Basic:
Read through the exercise documentation linked above and understood the required procedures.
By the end of the 2nd lab session
By the end of the second laboratory session, you should have completed and had marked the following:
- Basic:
IR Sensor Measurement + Graph - Basic:
Externally Powered Servo
Before the start of the 3rd lab session
Before attending the third lab session, you should have:
- Completed and double-checked the circuit wiring for the following two exercises:
- Basic:
DC Motor - Basic:
Encoders + Motor
- Basic:
Read through the exercise documentation linked above and understood the required procedures.
By the end of the 3rd laboratory session
By the end of the third laboratory session, ensure that you have all remaining basic exercises completed and marked:
- Basic:
DC Motor - Basic:
Encoders + Motor
Note
To complete the